Facebook â Pages and Groups
By Patrick “Hotwheels” Sharon
Columbus Vulcan Riders Chapter 1-32
2011 Chapter President
There have been some questions on how Facebook can best be used by local chapters. With this document, I hope to be able to provide an overview of the differences between a Facebook Page and Group and how each can be used.
Facebook can be used as a communication tool just like the Yahoo Groups we setup for each chapter. It can be used as a means of communicating with members and non-members alike. You can setup events on Facebook and invite folks very easily. You can share your chapter’s accomplishments and activites with others outside of the VRA . The uses are quite varied and can be very helpful if you are willing to use it.
So first off, I would like to discuss the differences between a Page and a Group.
PAGE â A page is designed to be run by an organization to communicate broadly with people who like them. They are normally managed by a sole person, but admins can be setup to manage the page. A Page is generally available for ANYONE on Facebook to see and like. So anyone can Like a page and become connected with it and follow any updates on the news feed. With a Page, the admins can share posts on the page under the Page Name and setup custom tabs for the pages and track the page growth and activity.
GROUP â A Group is a closed space for a small group of people to communicate with each other. Groups have more privacy options than Pages. You can control who can see what is being posted in the group at any time. In addition, you can control who is and isnât added to the group. Members must request to join and they must be granted permission to join by someone already in the group. Only Group members will be allowed to post in the groups. With groups you can setup an email list, have group chats with everyone, upload and share photos and Documents, and invite members to group events.
As you can see, each can be beneficial but you need to determine which one best fits your needs. Instructions for creating both are provided below:
How to Create a Page
To create a Page, login to Facebook with the account you want the page to be associated with. Keep in mind that this account will be the one tied to the Page so if there is a chance you will not be the responsible one for this page, consider using a generic account that can be delegated to someone else in the future.
In the upper right hand corner of the screen will be your Account Name, Home and a drop down arrow. Click on the drop down arrow to view the selection menu as shown below.
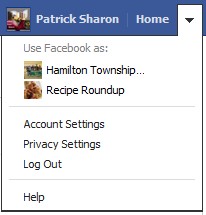
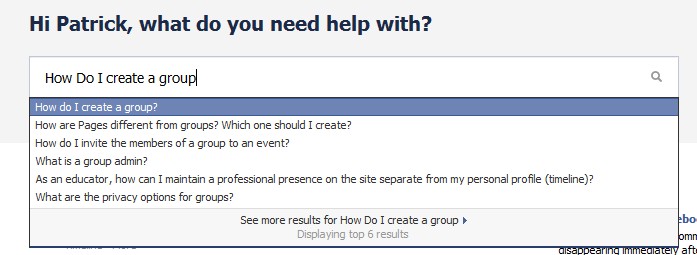
Select Help from the drop down menu. When the Help screen appears, type in, “how can I create a Page?”
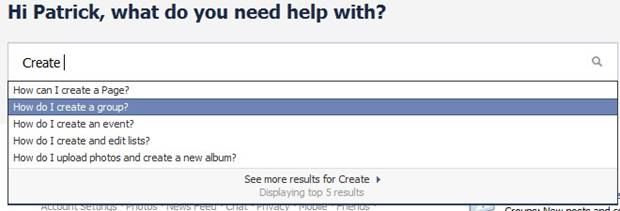
Click on the highlighted “here” to go to the creation page.

From here, you will need to select the type of Page you are setting up from the drop down menu. Organization would probably be most applicable.
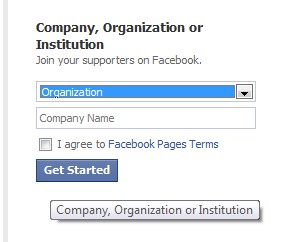
Enter the name you want your page to have.  Click the checkbox to agree to Facebook’s Pages Terms and then click on “Get Started”.
You will then be able to Upload and set a profile picture for the page, invite friends, share the page on your wall and add basic information such as website and a description for your page.
Once you have the page created, you can update it as you need to. To edit your page, click on the Box that says “Edit Page” in the upper Right-hand side of the page. Click on the box and it will open up the Page editor.
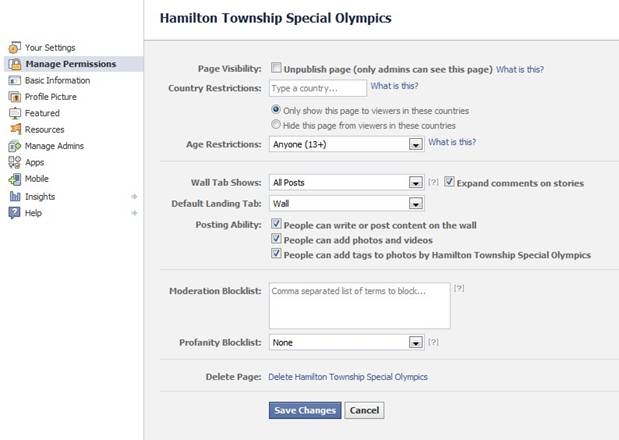
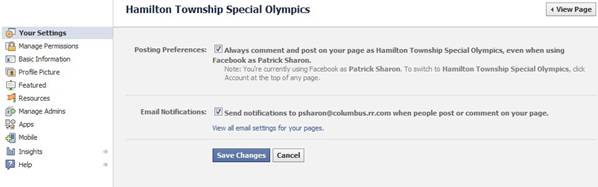
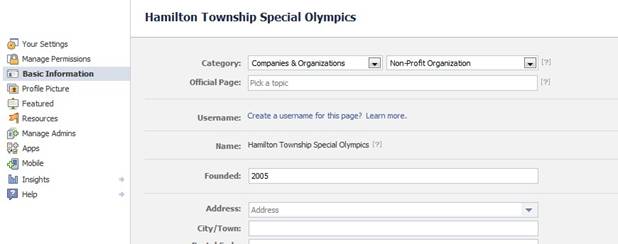
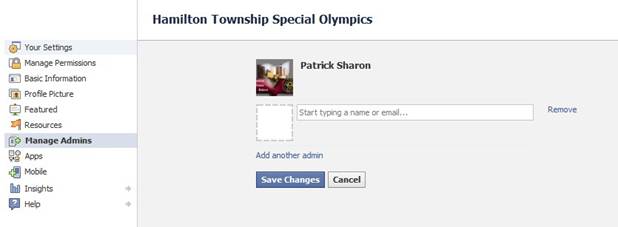
From here you can change just about anything about this page. Settings and notifications, permissions, basic info about the page and what the organization is, profile pictures and more as you can see from above. Here are a few screenshots from a couple of the tabs:
The Help pages will assist you more if you need more information.
Points to remember:
- Remember to use an account that is not your personal account to setup a Page.
- Anyone can Like your page and post to your Page. You cannot control who can view or post to your Page.
- Admins can post to the page as the page name so messages will display as coming from the organization instead of a particular person.
How to Create a Group
Unlike Pages, Groups are not associated with a specific Account so it does not matter what account you create the group under. Whatever account you do use though, will be the initial Admin for that group. Others can be promoted to admin as necessary.
In the upper right-hand corner of the screen will be your Account Name, Home and a drop down arrow. Click on the drop down arrow to view the selection menu below.
Select Help from the drop down menu. When the Help screen appears, type in “How do I create a Group?”
Select the result to Create a group and you will see the following:
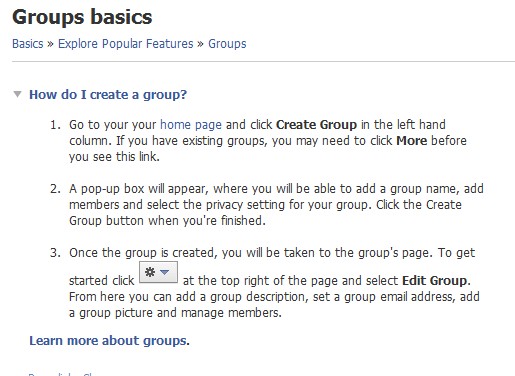
When you go back to your home page, you should see on the left-hand side of the screen a section that says Groups and under there should be an option to Create Group.
click on “Create a Group” at the bottom and a window will pop up to allow you to name your group, add members and select a privacy option.
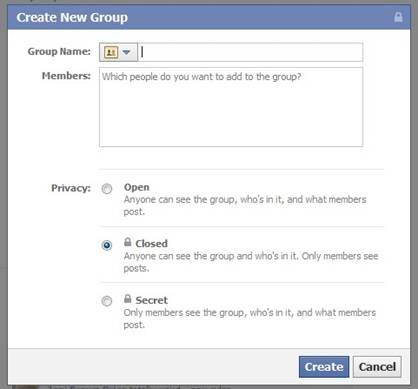
As a final step, click on “Create” to create your group.
Once created, you can then edit the group with more detailed information. In the upper right-hand corner of the page will be a little gear with a down arrow. If you click on the gear icon, it will display a dropdown menu. Select “Edit Group” from to update the group information:
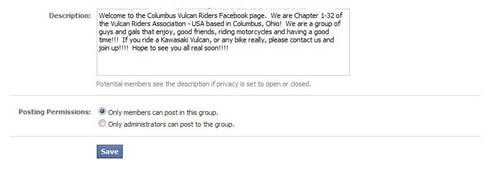
While in Edit mode, you can update the group’s profile picture, group name, privacy, who can approve memberships, setup group email and determine who can post in the group.
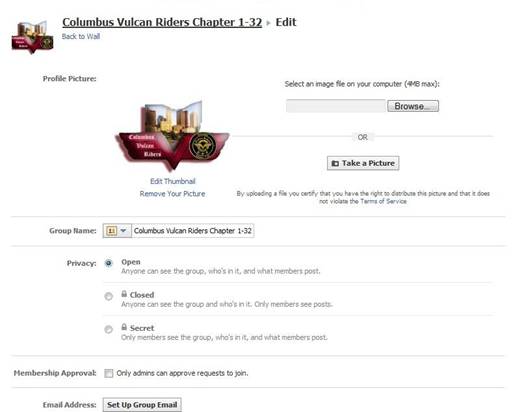
NOTE:Â Be sure to click on Save at the bottom of the screen.
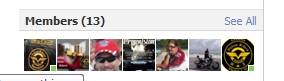
It would be advantageous to setup at least 2 people as Admins for the group. To add admins, in the upper right of the screen it will show the number of Members and some of their profile pics. There is a “See All” link there. Click on it.
Once you click on “See All”, it will list all members. Any that are Admins will be listed first and then the rest will be listed in alphabetical order by last name:

Find the person you want to make an admin and click on “Make Admin”. Additionally, you can remove someone from the admin role by clicking on “Remove Admin” next to their name.
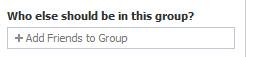
Anyone can add a member to the group by entering a friend’s name in the box on the right had side of the screen:
As people find the group, they can request to join the group. If the group is configured so that only Admins can add people to the group, they will have to wait to be approved by an admin. A notification will be sent to the group that a request has been made and the appropriate people can then approve the request if they want.
Any member of the group can upload pictures to the albums. There is also an option to create documents that everyone can contribute to.
With a group, you can also do Group Chat with everyone in the group who is online. You can also set up a group email list which will allow you to send an email to everyone in the group very easily using one email address.
Points to remember:
- Anyone can create a group. Once created. it is not directly associated with a specific person or email address.
- Admins control who can be added to the group.
- Only members can post to the Group page.
- Everyone in the group can post and share photos and collaborate on documents
- Group chat is available.
Good luck with whichever way you decide to go!!!